LogoLogo
API ReferenceGitHubSlackService StatusLogin
v3.8.16
v3.8.16
  • Deep Lake Docs
  • Vector Store Quickstart
  • Deep Learning Quickstart
  • Storage & Credentials
    • Storage Options
    • User Authentication
    • Storing Deep Lake Data in Your Own Cloud
      • Microsoft Azure
        • Provisioning Federated Credentials
        • Enabling CORS
      • Amazon Web Services
        • Provisioning Role-Based Access
        • Enabling CORS
  • List of ML Datasets
  • 🏢High-Performance Features
    • Introduction
    • Performant Dataloader
    • Tensor Query Language (TQL)
      • TQL Syntax
      • Sampling Datasets
    • Deep Memory
      • How it Works
    • Index for ANN Search
      • Caching and Optimization
    • Managed Tensor Database
      • REST API
      • Migrating Datasets to the Tensor Database
  • 📚EXAMPLE CODE
    • Getting Started
      • Vector Store
        • Step 1: Hello World
        • Step 2: Creating Deep Lake Vector Stores
        • Step 3: Performing Search in Vector Stores
        • Step 4: Customizing Vector Stores
      • Deep Learning
        • Step 1: Hello World
        • Step 2: Creating Deep Lake Datasets
        • Step 3: Understanding Compression
        • Step 4: Accessing and Updating Data
        • Step 5: Visualizing Datasets
        • Step 6: Using Activeloop Storage
        • Step 7: Connecting Deep Lake Datasets to ML Frameworks
        • Step 8: Parallel Computing
        • Step 9: Dataset Version Control
        • Step 10: Dataset Filtering
    • Tutorials (w Colab)
      • Vector Store Tutorials
        • Vector Search Options
          • Deep Lake Vector Store API
          • REST API
          • LangChain API
        • Image Similarity Search
        • Deep Lake Vector Store in LangChain
        • Deep Lake Vector Store in LlamaIndex
        • Improving Search Accuracy using Deep Memory
      • Deep Learning Tutorials
        • Creating Datasets
          • Creating Complex Datasets
          • Creating Object Detection Datasets
          • Creating Time-Series Datasets
          • Creating Datasets with Sequences
          • Creating Video Datasets
        • Training Models
          • Splitting Datasets for Training
          • Training an Image Classification Model in PyTorch
          • Training Models Using MMDetection
          • Training Models Using PyTorch Lightning
          • Training on AWS SageMaker
          • Training an Object Detection and Segmentation Model in PyTorch
        • Updating Datasets
        • Data Processing Using Parallel Computing
      • Concurrent Writes
        • Concurrency Using Zookeeper Locks
    • Playbooks
      • Querying, Training and Editing Datasets with Data Lineage
      • Evaluating Model Performance
      • Training Reproducibility Using Deep Lake and Weights & Biases
      • Working with Videos
    • Low-Level API Summary
  • 🔬Technical Details
    • Best Practices
      • Creating Datasets at Scale
      • Training Models at Scale
      • Storage Synchronization and "with" Context
      • Restoring Corrupted Datasets
      • Concurrent Writes
    • Data Layout
    • Version Control and Querying
    • Dataset Visualization
    • Tensor Relationships
    • Visualizer Integration
    • Shuffling in dataloaders
    • How to Contribute
Powered by GitBook
On this page
  • Setting up Role-Based Access for AWS S3
  • Step 1: Create the AWS IAM Policy
  • Step 2: Create the AWS IAM Role
  • Step 3: Grant Access to AWS KMS Key (only for buckets that are encrypted with customer managed KMS keys)
  • Step 4: Enter the created AWS Role ARN (Step 2) into the Activeloop UI

Was this helpful?

  1. Storage & Credentials
  2. Storing Deep Lake Data in Your Own Cloud
  3. Amazon Web Services

Provisioning Role-Based Access

How to provision Role-Based Access in S3

PreviousAmazon Web ServicesNextEnabling CORS

Was this helpful?

Setting up Role-Based Access for AWS S3

The most secure method for connecting data from your AWS account to Deep Lake is using Federated Credentials and Role-Based Access, which are set up using the steps below:

Step 1: Create the AWS IAM Policy

1. Login to the AWS account where the IAM Role will be created and where the data is stored.

2. Go to the IAM page in the AWS UI, which can be done by searching "IAM" in the console and locating the IAM page under Services.

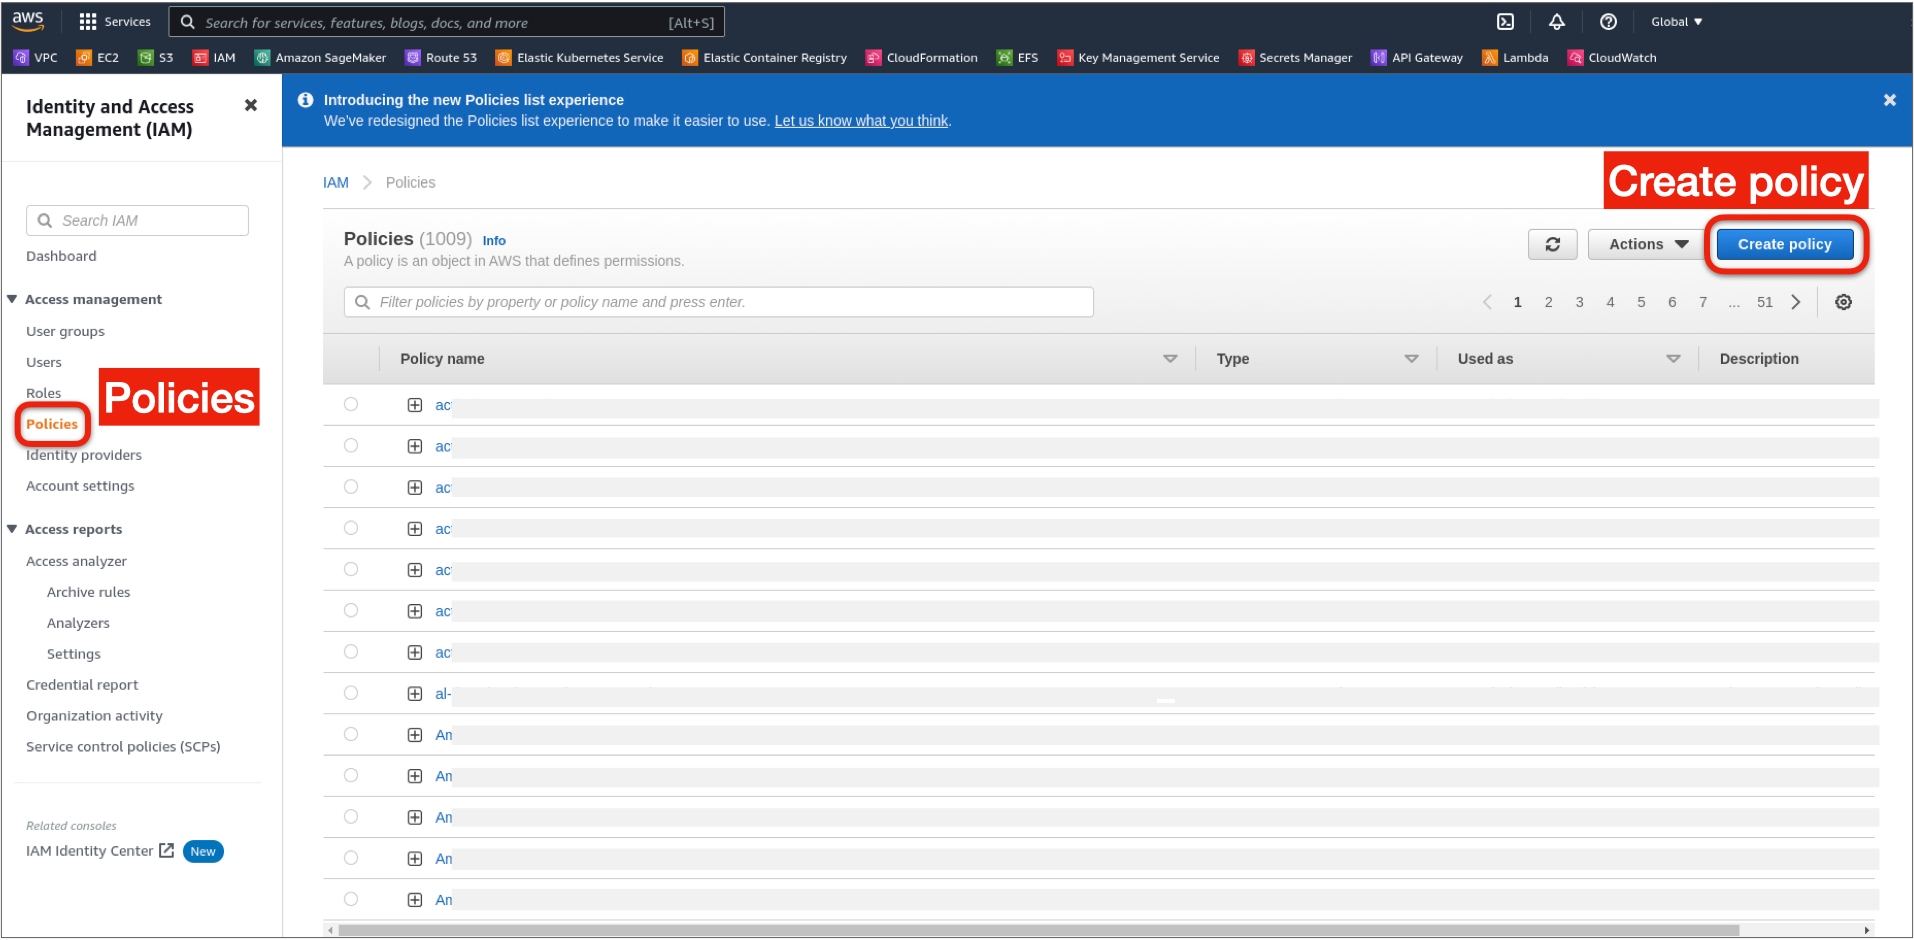
3. In the left nav, open the Policies under Access management and on Create policy on the right.

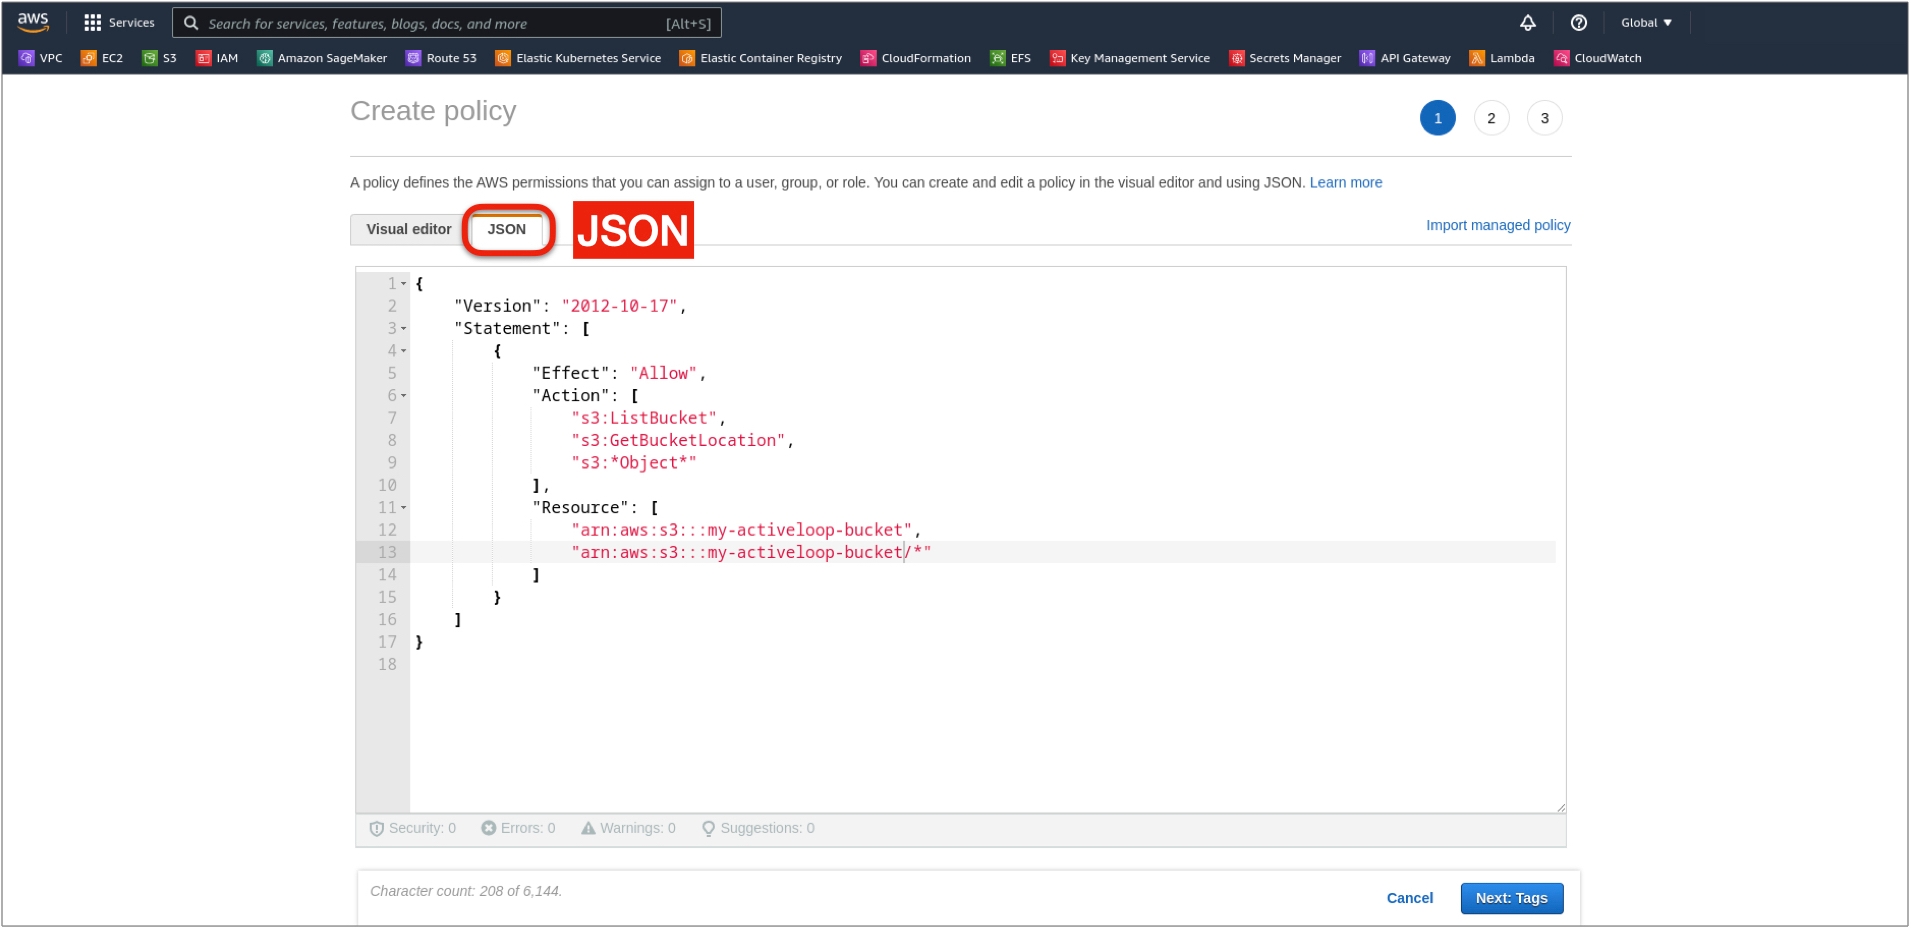
5. Select the JSON tab instead of Visual editor.

6. Replace the code in the editor with the code below. Replace BUCKET_NAME with the bucket names for which you want to grant role-based access:

{
    "Version": "2012-10-17",
    "Statement": [
        {
            "Effect": "Allow",
            "Action": [ 
                "s3:ListBucket",
                "s3:GetBucketLocation",
                "s3:GetObject",
                "s3:PutObject",
                "s3:DeleteObject"
            ],
            "Resource": [
                "arn:aws:s3:::BUCKET_NAME",
                "arn:aws:s3:::BUCKET_NAME/*"
            ]
        }
    ]
}

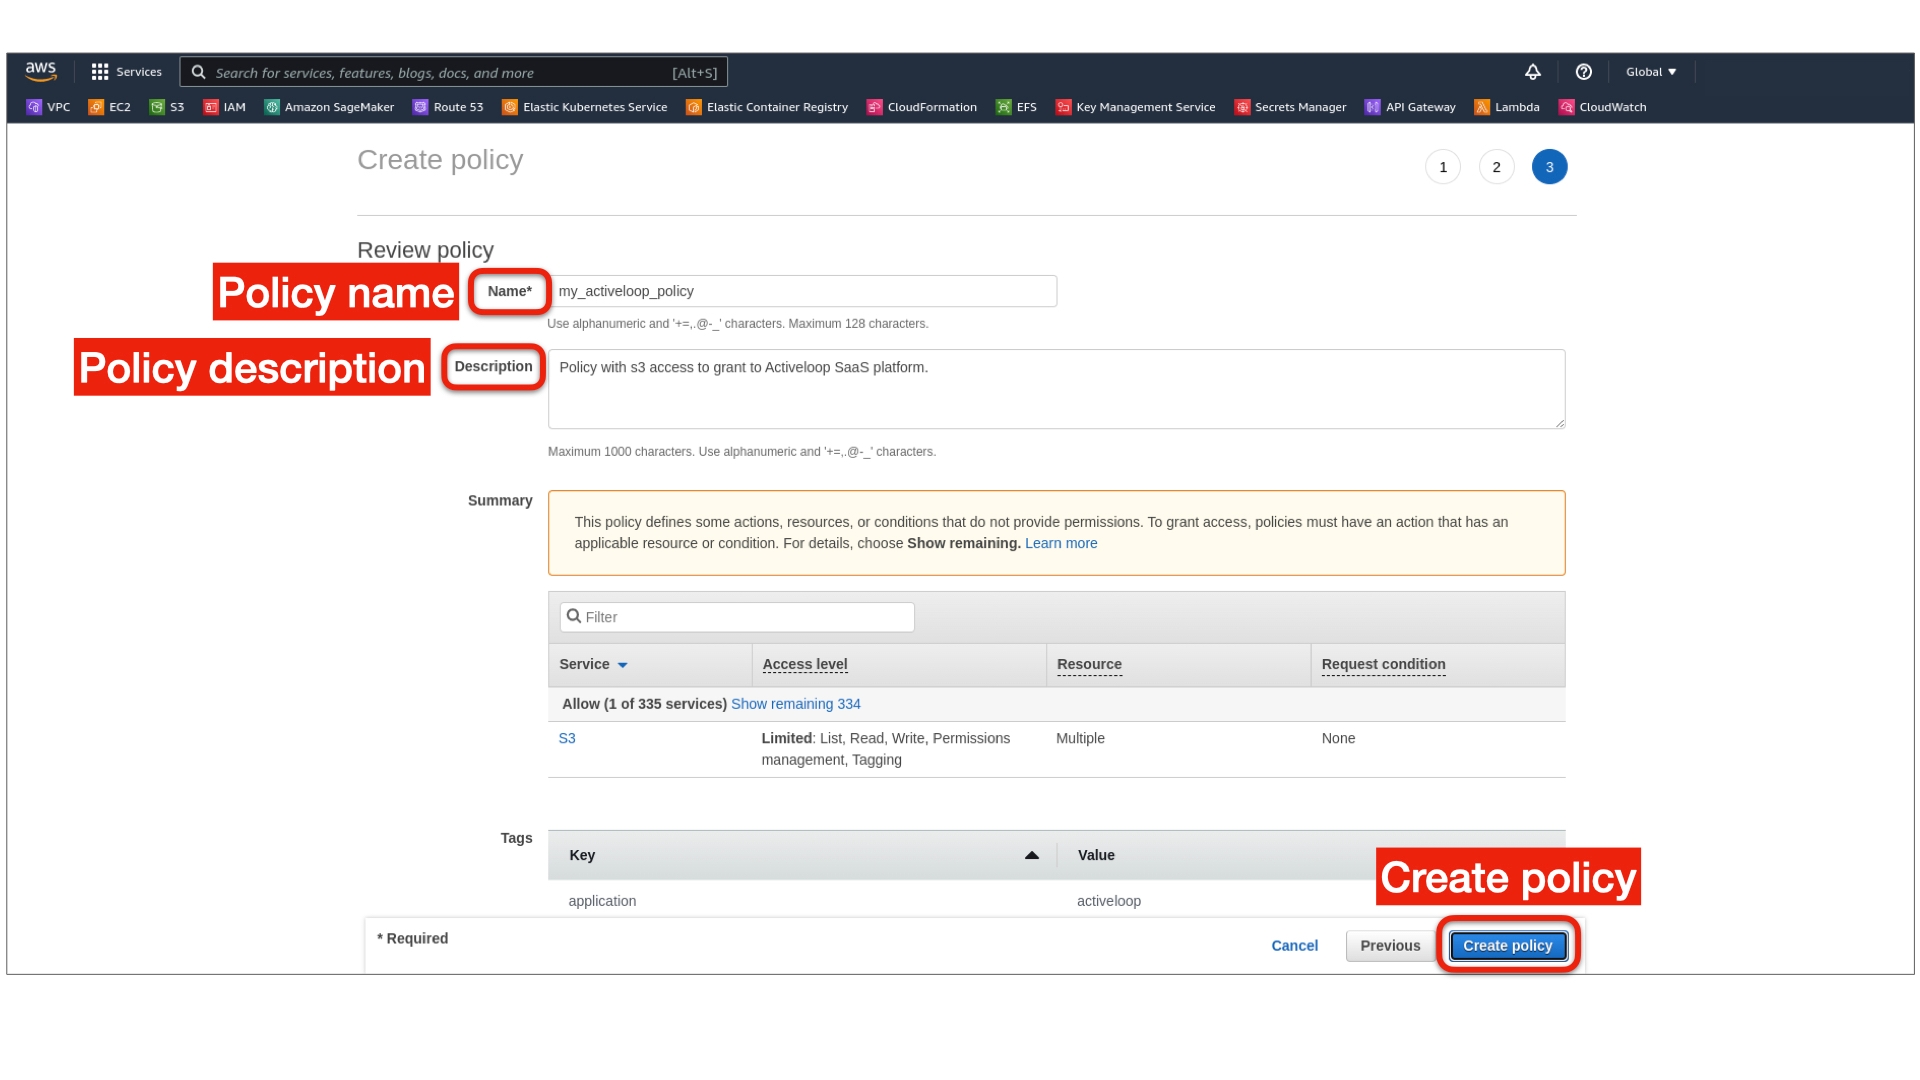
7. On the bottom right, click Next: Tags (create tags if needed) and Next: Preview, enter the policy name and description, and click Create policy

Step 2: Create the AWS IAM Role
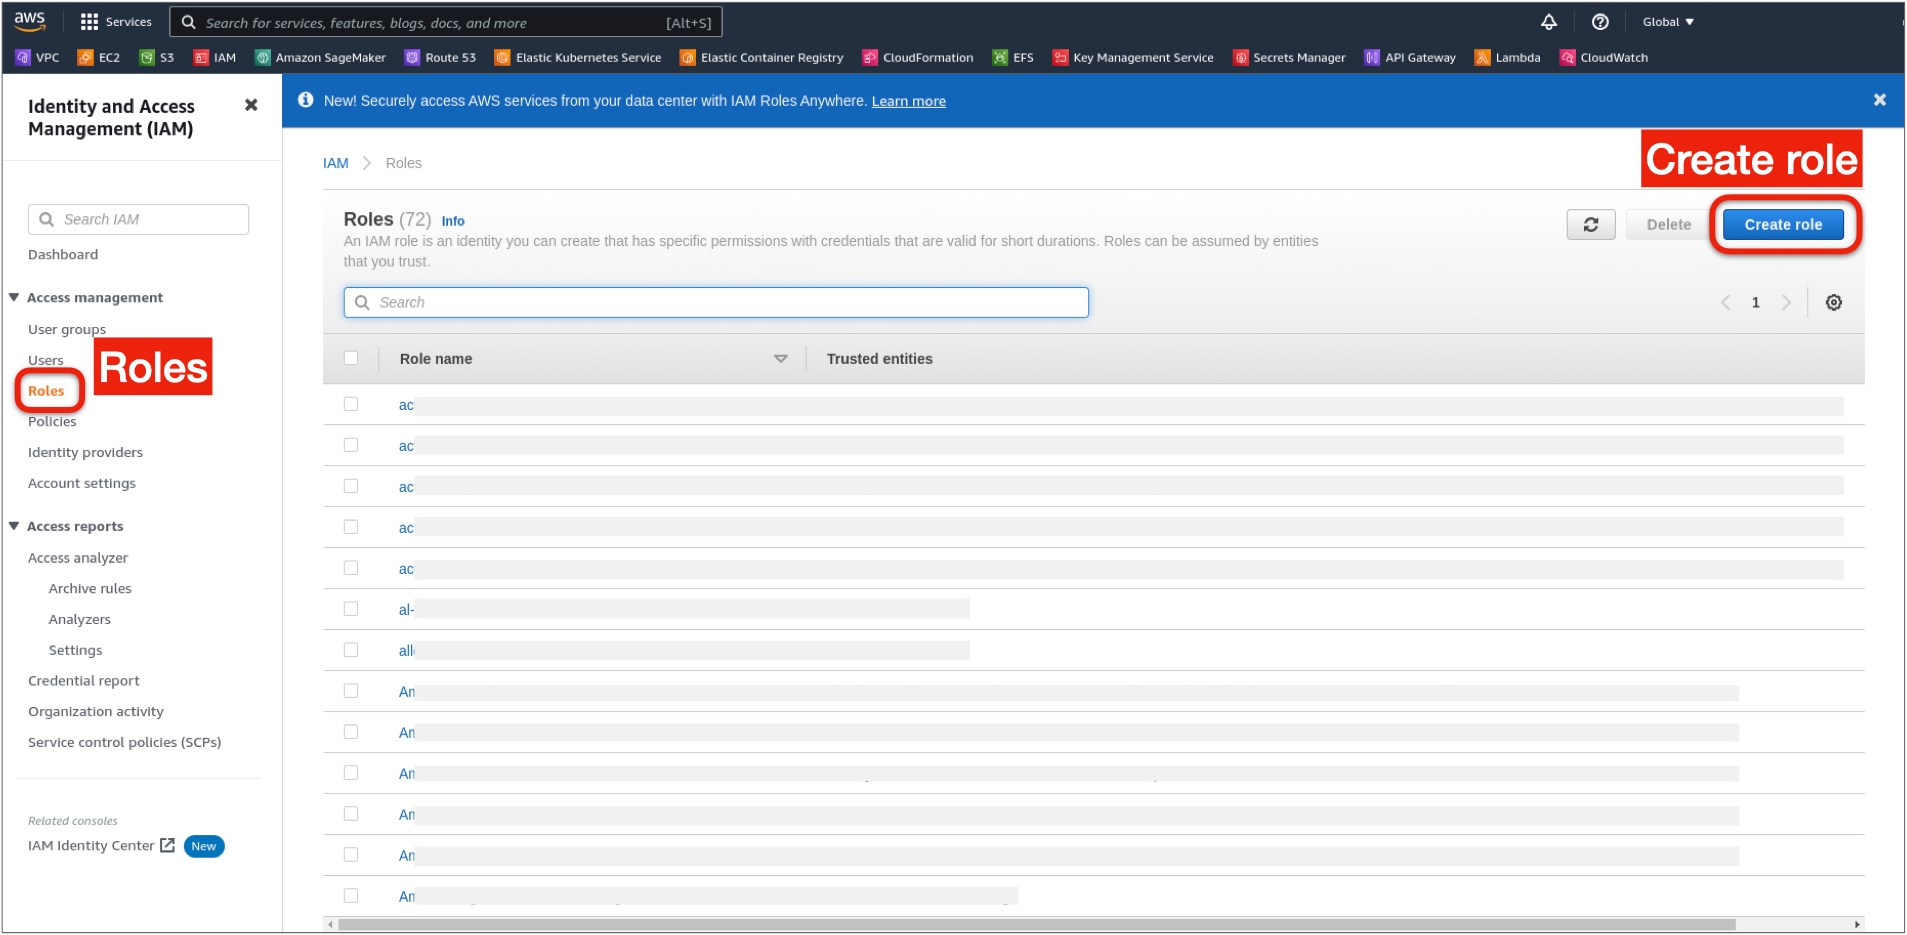
1. On the IAM page, in the left nav, open the Roles under Access management, and click Create role on the right.

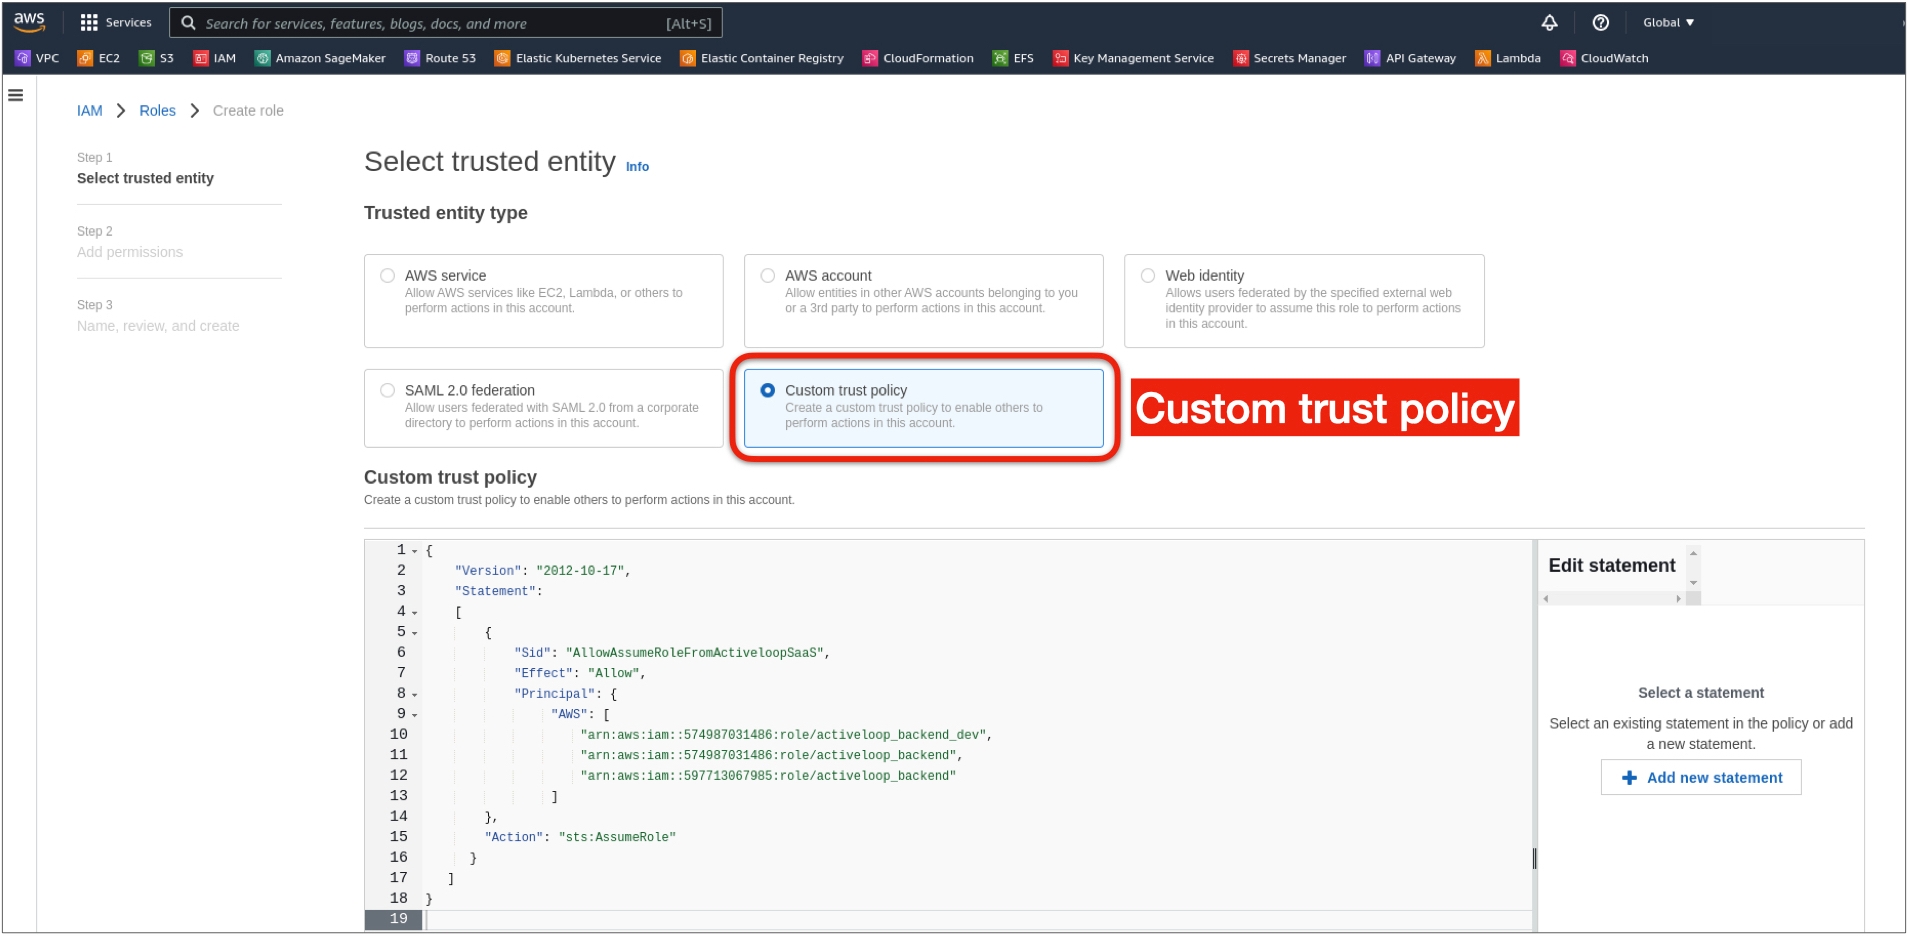
3. Select Custom trust policy from the list of options.

4. Replace the policy definition with the code below and click Next

{
    "Version": "2012-10-17",
    "Statement": 
    [
        {
            "Sid": "AllowAssumeRoleFromActiveloopSaaS",
            "Effect": "Allow",
            "Principal": {
                 "AWS": "arn:aws:iam::597713067985:role/activeloop_backend"
        },
        "Action": "sts:AssumeRole"
      }
   ]
}

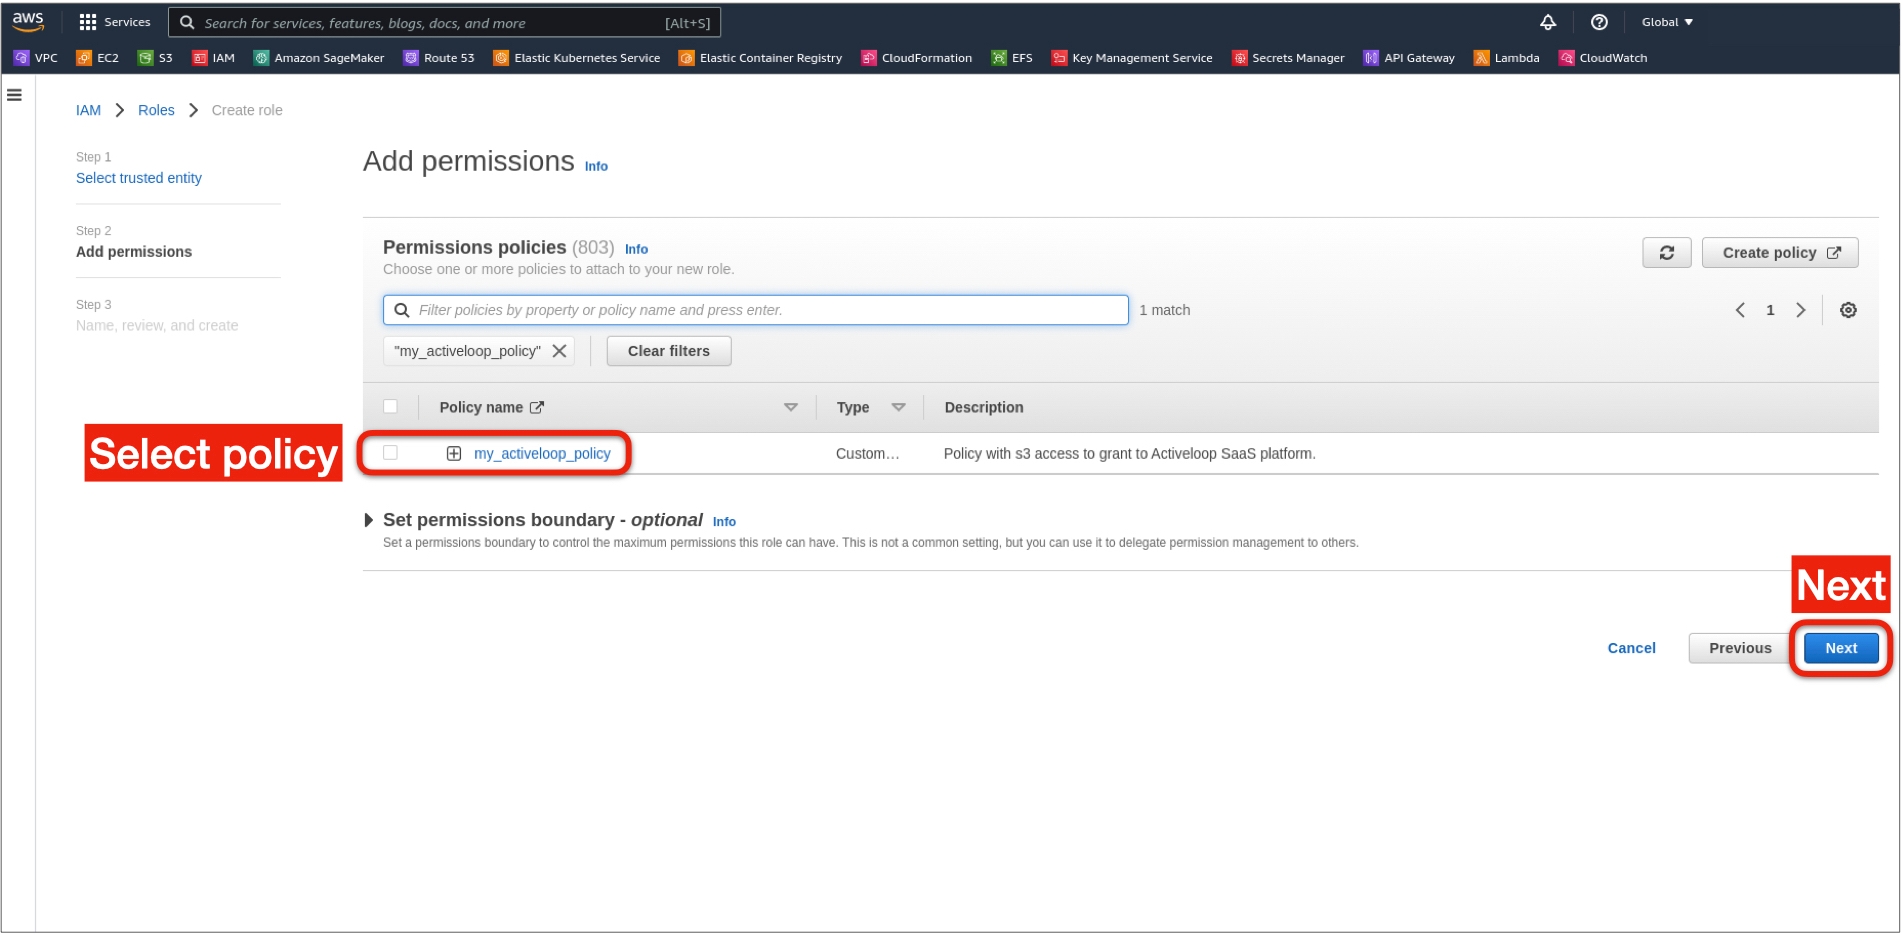
5. From the provided policy list, select the previously created policy from Step 1 and click Next

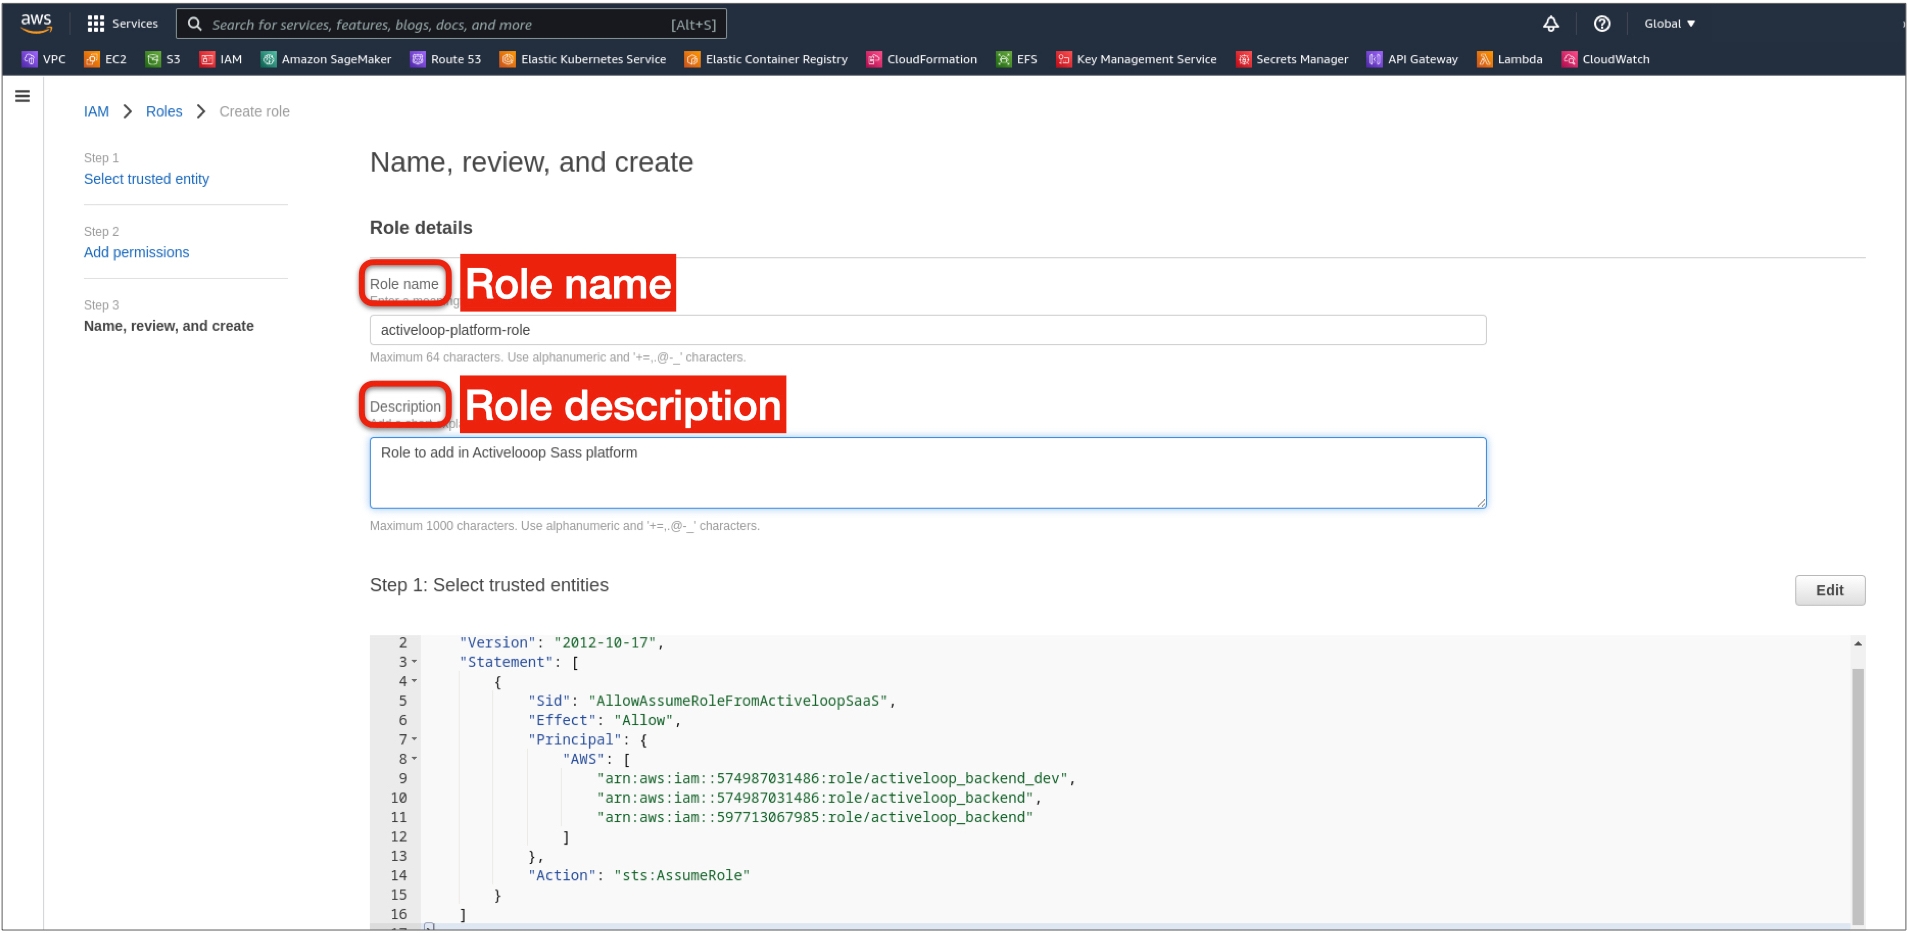
6. Set the name and description for the role and click Create role at the bottom.

Step 3: Grant Access to AWS KMS Key (only for buckets that are encrypted with customer managed KMS keys)
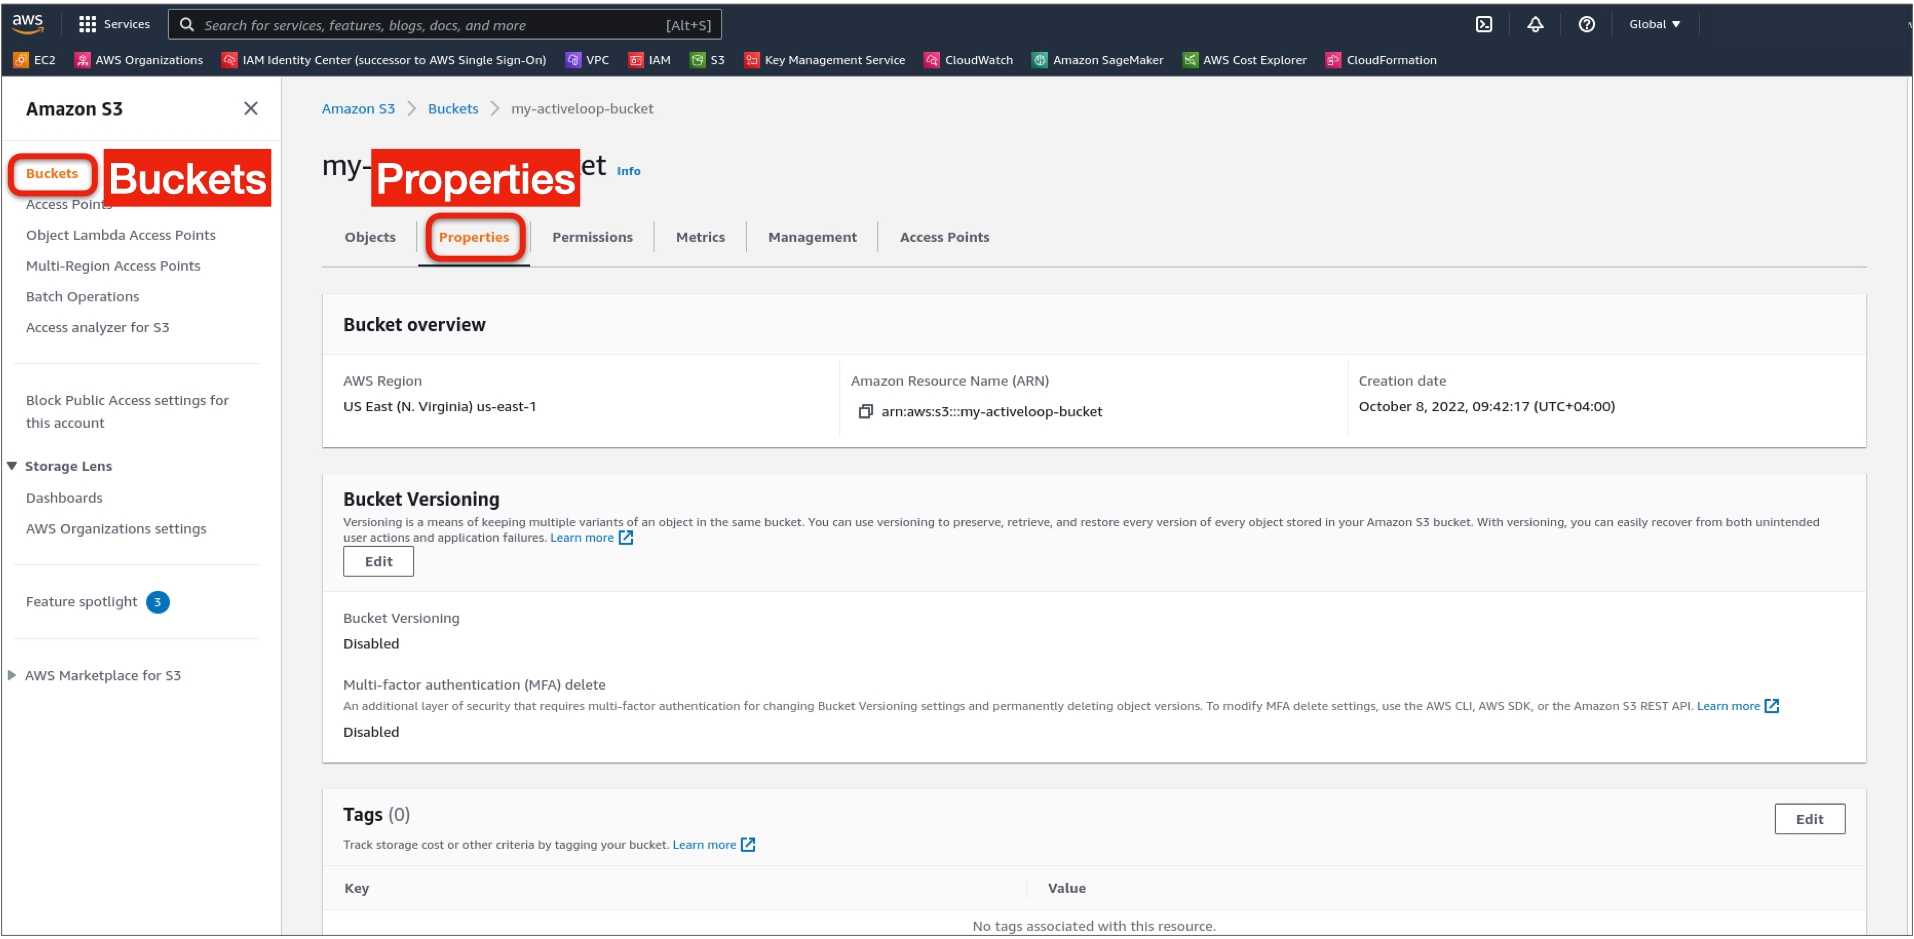
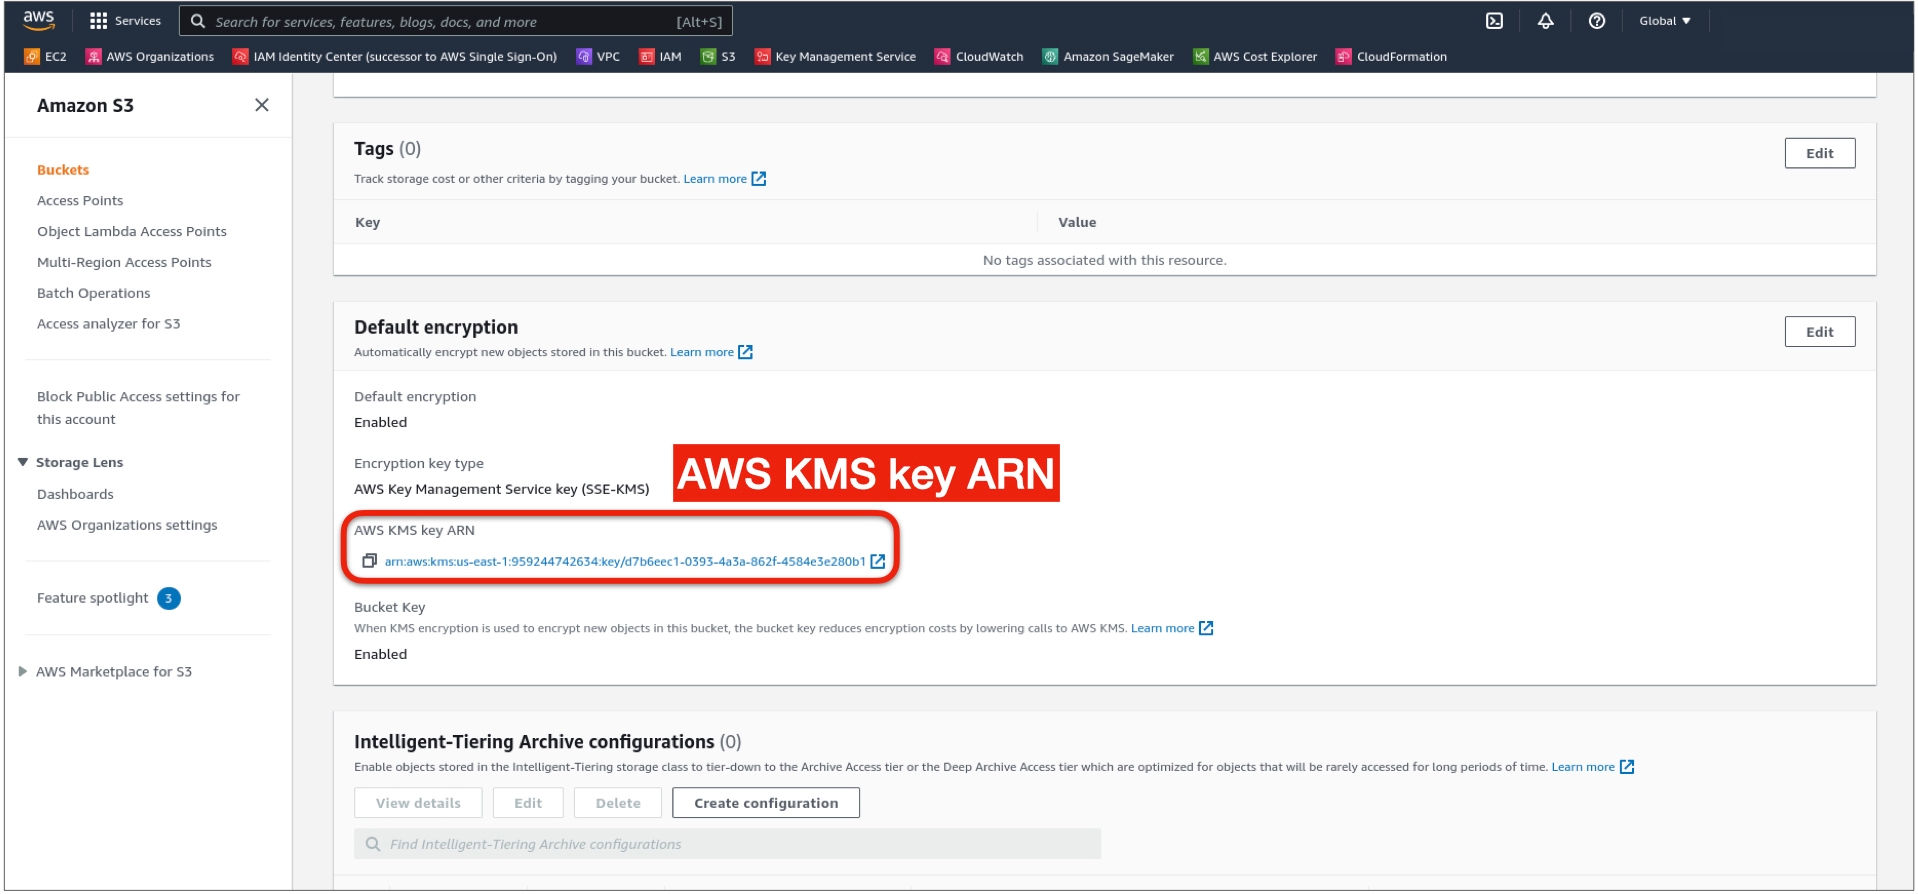
1. Navigate to the bucket in the AWS S3 UI

2. Open the bucket Properties

3. Scroll down to Default encryption and copy the AWS KMS key ARN

4. In the Policy creation step (Step 1, Sub-step 6), use the JSON below in the policy statement, and replace YOUR_KMS_KEY_ARN with the copied Key ARN for the encrypted bucket.

{
    "Version": "2012-10-17",
    "Statement": [
        {
            "Effect": "Allow",
            "Action": [
                "s3:ListBucket",
		 "s3:GetBucketLocation",
                "s3:*Object*"
            ],
            "Resource": [
                "arn:aws:s3:::BUCKET_NAME",
                "arn:aws:s3:::BUCKET_NAME/*"
            ]
        },
        {
            "Effect": "Allow",
            "Action": [
                "kms:Encrypt",
                "kms:Decrypt",
                "kms:ReEncrypt*",
                "kms:GenerateDataKey*",
                "kms:DescribeKey"
            ],
            "Resource": [
                "YOUR_KMS_KEY_ARN”
            ]
        }
    ]
}

Step 4: Enter the created AWS Role ARN (Step 2) into the Activeloop UI

See the first video in the link below:

Storing Deep Lake Data in Your Own Cloud